Windows
Windows
一、磁盘管理
1.删除恢复分区(Recovery Partion)
命令行进入diskpart,选中需要删除的磁盘和分区,然后设置gpt attributes=0x8000000000000000,再执行delete partition即可删除。栗子:
list disk
sel disk 0
list partition
sel partition 1
gpt attributes=0x8000000000000000
delete partition
2.删除EFI分区
命令行进入diskpart,选中需要删除的分区,然后设置SET ID=ebd0a0a2-b9e5-4433-87c0-68b6b72699c7,荔枝:
list disk
sel disk 0
list partition
sel partition 1
SET ID=ebd0a0a2-b9e5-4433-87c0-68b6b72699c7
二、关闭 Windows 11 中的 Windows Defender
2.1 Disable Microsoft Defender Using Group Policy Settings
The first way to disable Defender is by using the Group Policy security tool. To do just that, follow these steps:
Click on Start, then Settings.

Choose Privacy & security, Windows Security, then Virus & threat protection.
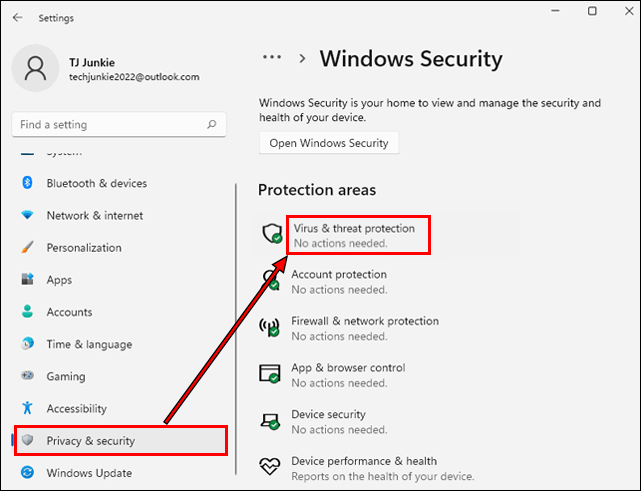
Under Virus & threat protection settings, click on Manage settings.
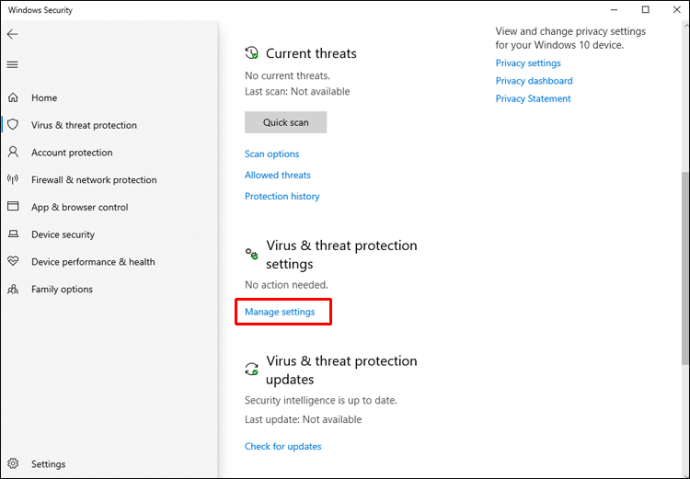
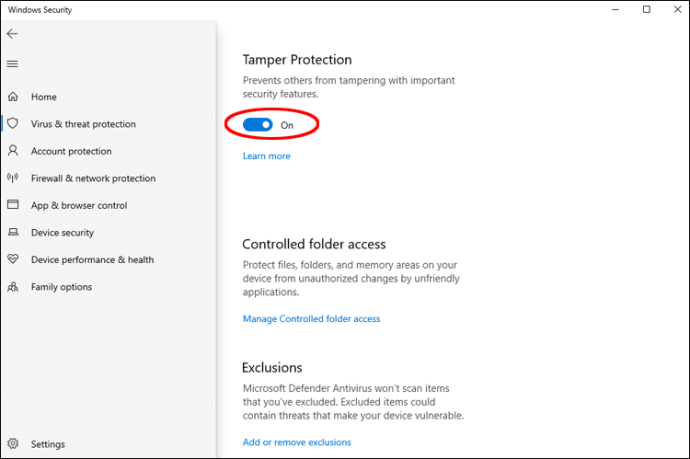
Scroll down to the Tamper Protection option, and toggle the slider to Off.
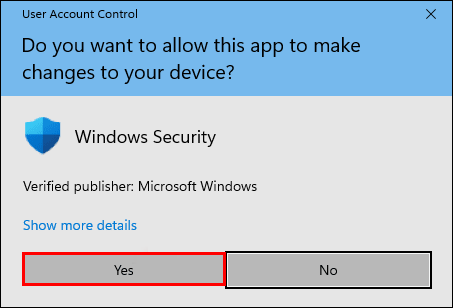
Choose Yes to confirm the Do you want to allow this app to make changes to your device? prompt.
In the Tamper Protection section, a message will display stating that your device may be vulnerable. Use the x in the top right to close the window.
gpedit.mscFrom the taskbar, press the search icon to enter a search for Edit group policy, then click the result to run the Group Policy editor.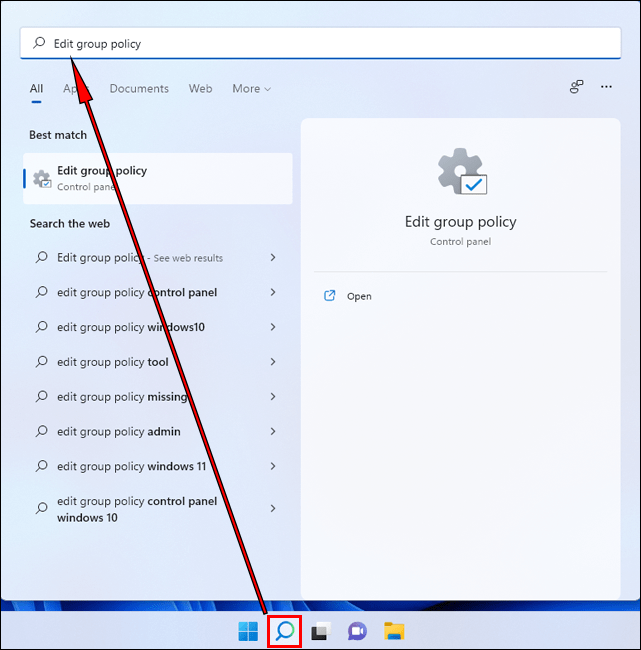
In the app’s window on the left pane, find Computer Configuration and select the Administrative Templates, then Windows Components.
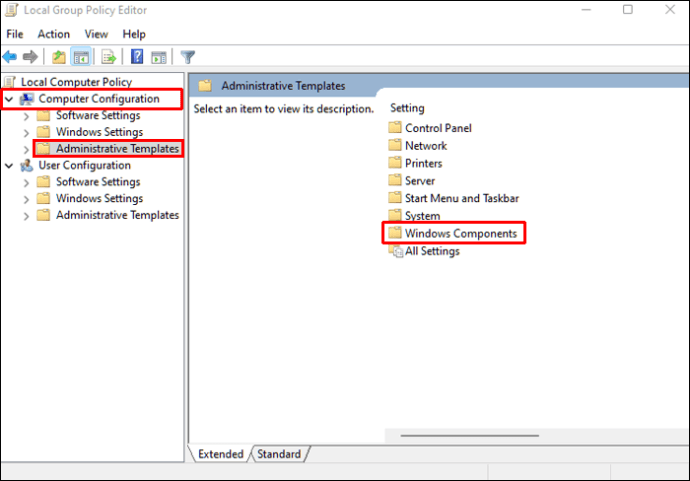
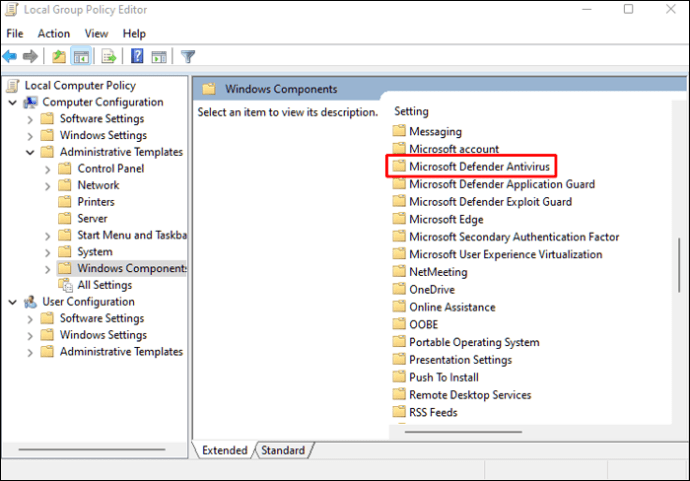
Scroll down to Microsoft Defender Antivirus.
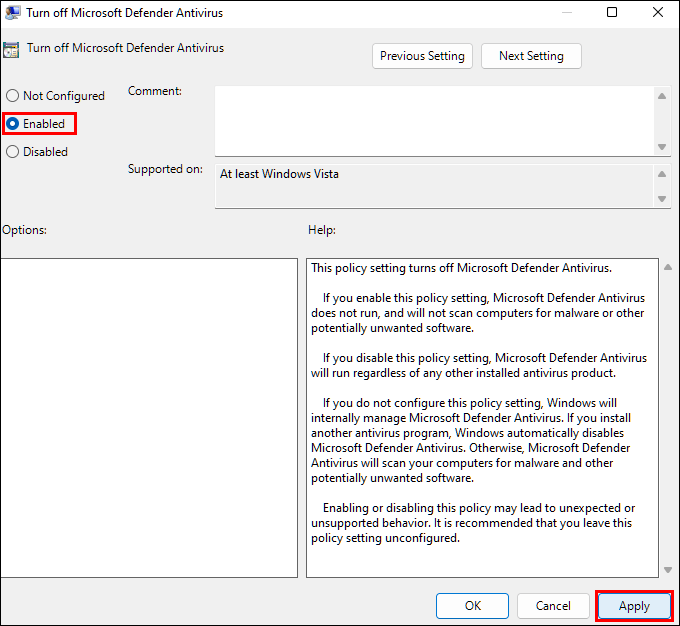
Look for the setting Turn off Microsoft Defender Antivirus in the right pane.
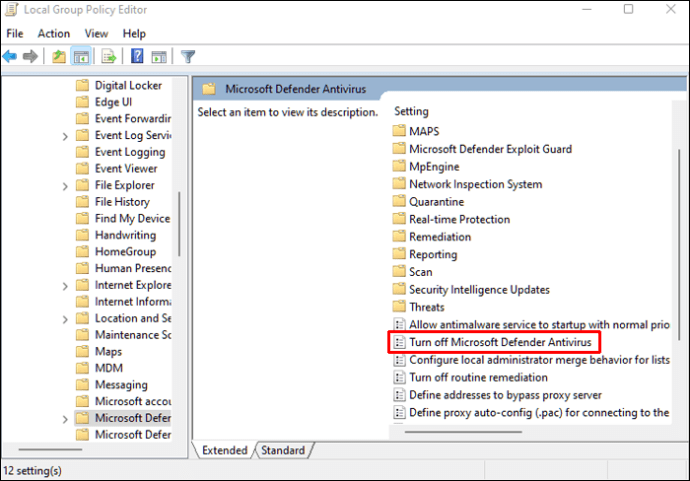
Right-click on it and choose Edit.

In the popup window, check the Enabled box, then Apply, and OK.
Next, look for the setting Allow antimalware service to remain running always and right-click it. Then press Edit.
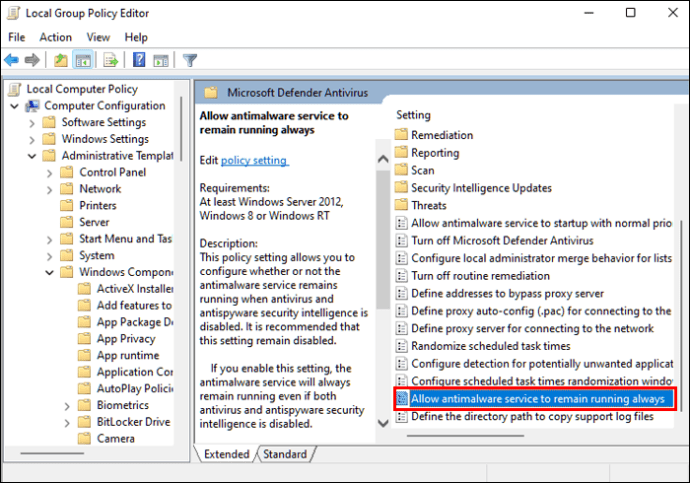
This time, check the Disabled option, click Apply, then OK.
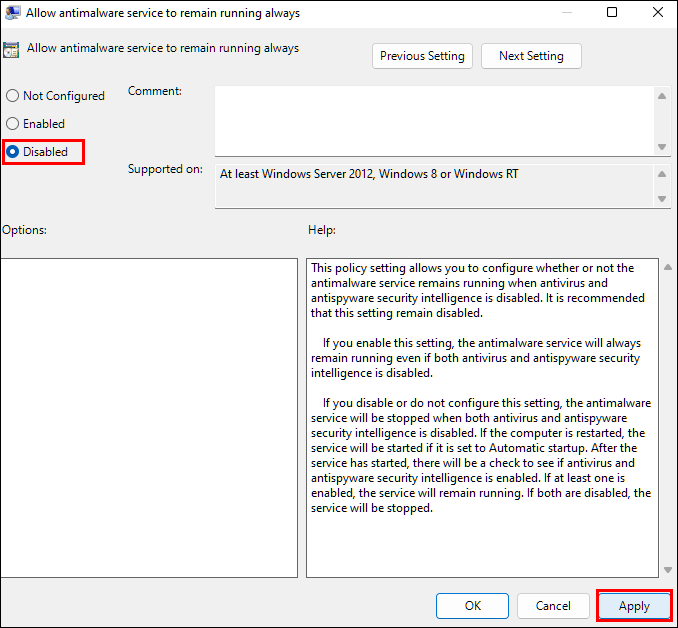
Now look for the folder called Real-time Protection and double-click it to open.
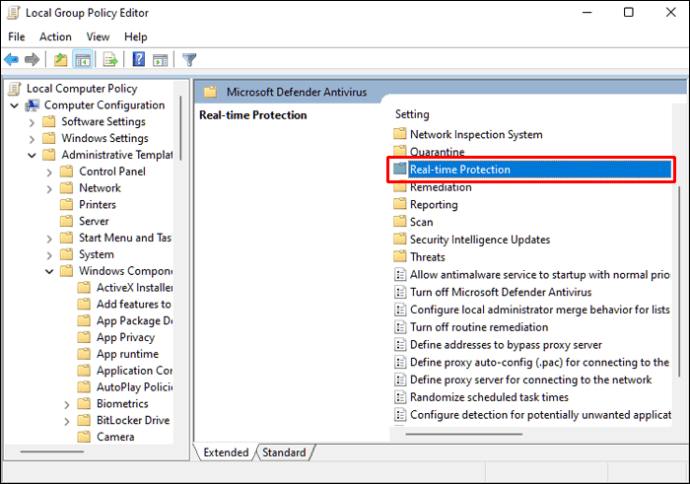
Right-click the setting Turn off real-time protection, then choose Edit.
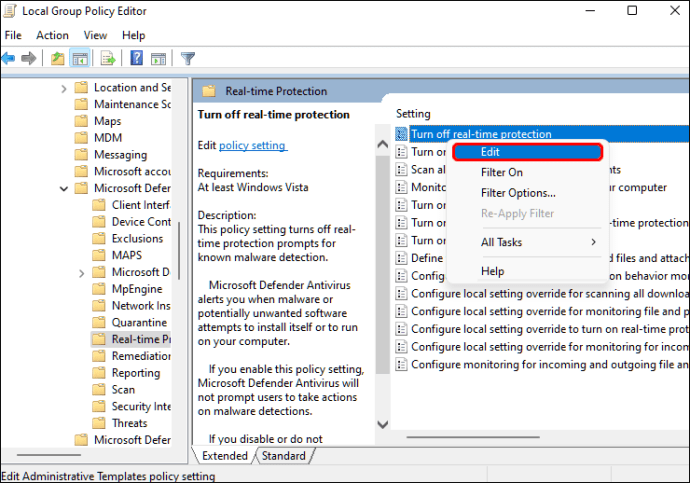
Check the Enabled box, click Apply, then OK.
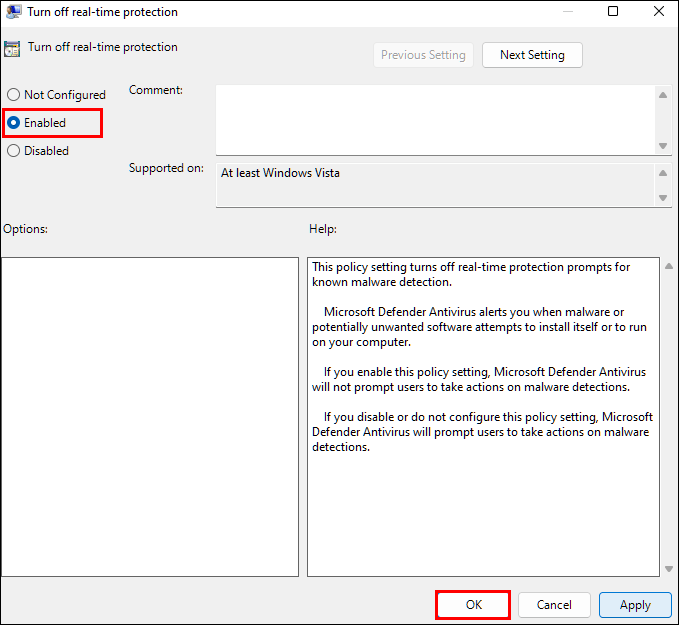
Now you have configured the group policy. You’ll need to set up a Task Scheduler to stop certain services from running and avoid errors once Defender has been disabled. To do this:
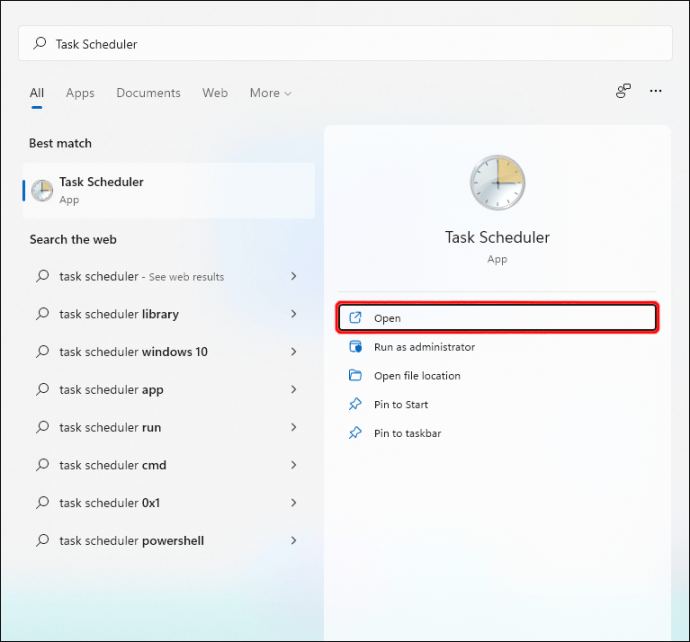
Enter a search for the Task Scheduler app, then open it.
Expand the Task Scheduler Library folder in the left pane.
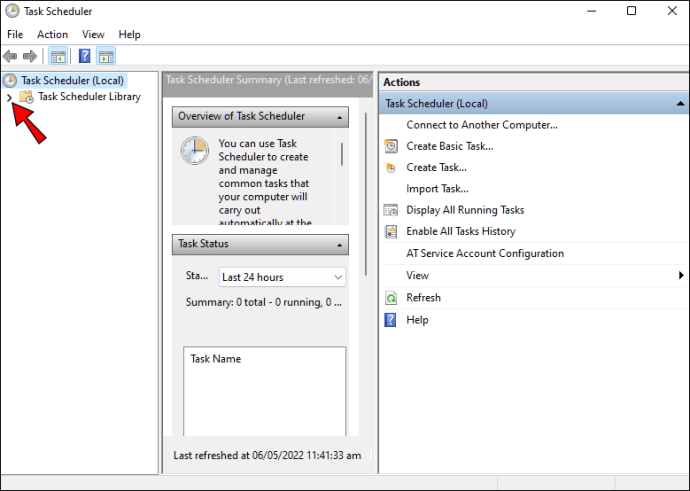
Expand Microsoft, Windows, then Windows Defender.
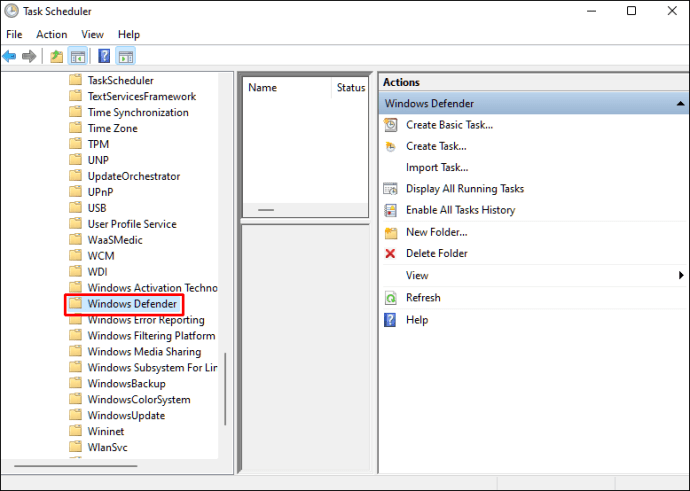
Right-click and Disable the following four tasks:
- Windows Defender Cache Maintenance
- Windows Defender Cleanup
- Windows Defender Scheduled Scan
- Windows Defender Verification
To update the computer and user policies:
Open the Command Prompt as admin.
Run the following command:
**gpupdate/force**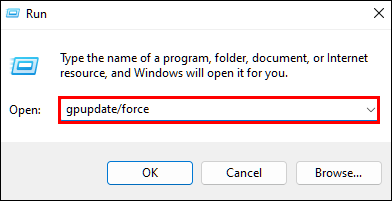
Windows Defender has been disabled and will not start up with Windows.
2.2 Disable Windows Defender by Modifying the Registry
Another way to deactivate Defender protection is by modifying the registry. Like the Group Policy option, this method requires the “Tamper Protection” setting to be disabled to stop the Defender settings from being tweaked. Follow these steps to do that:
Click on Start, then Settings.
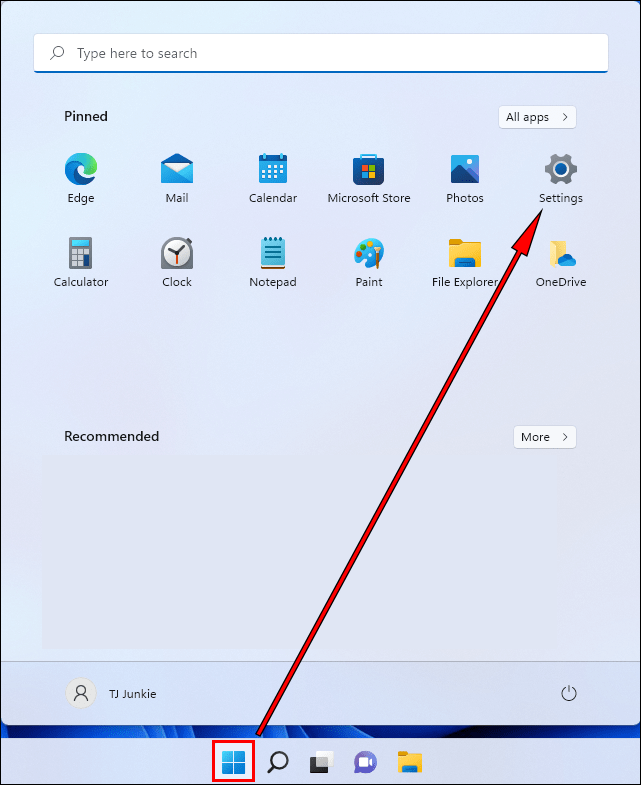
Click on Privacy & security, Windows Security, then Virus & threat protection.
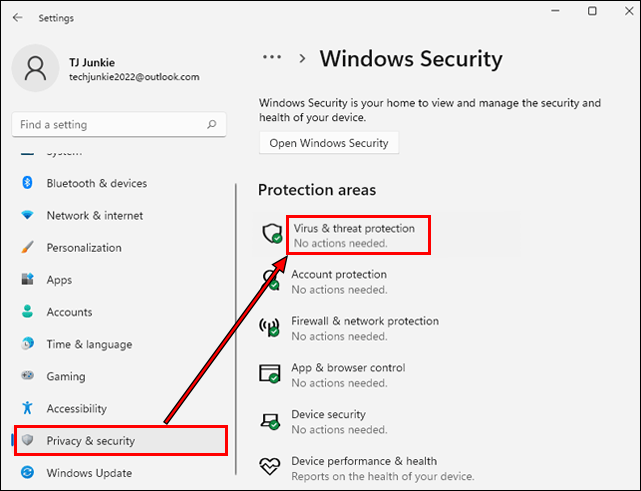
Beneath Virus & threat protection settings, click on Manage settings.

Scroll down to the Tamper Protection option, and switch the slider to Off.

Choose Yes to allow the changes.
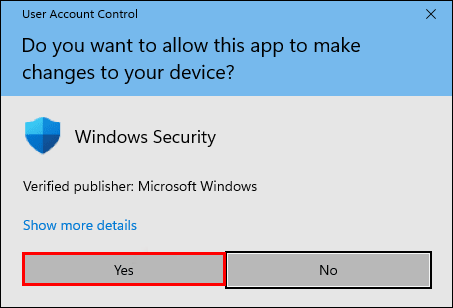
Use the x in the top right to close the window.
Now complete these pre-steps before editing the registry:
Right-click on the Start menu.
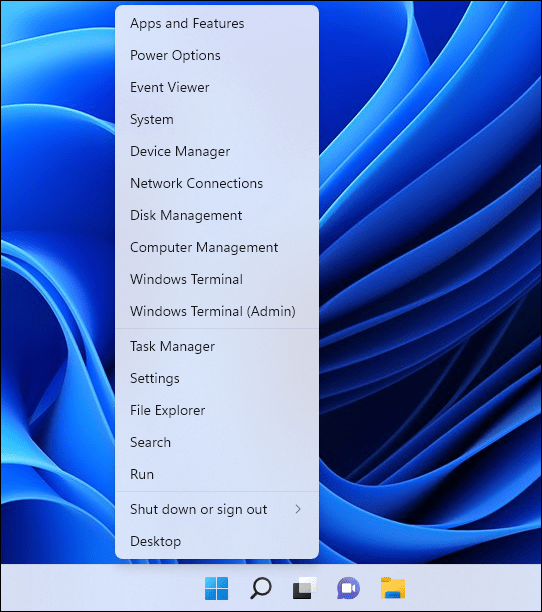
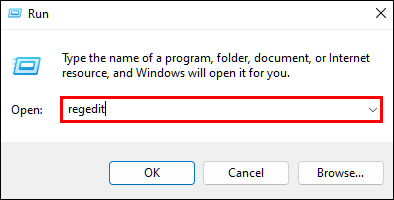
Select Run and type regedit in the text field, then hit Enter.
In the Registry Editor, enter the following path in the address field:
**HKEY_LOCAL_MACHINE\SOFTWARE\Microsoft\Windows Defender**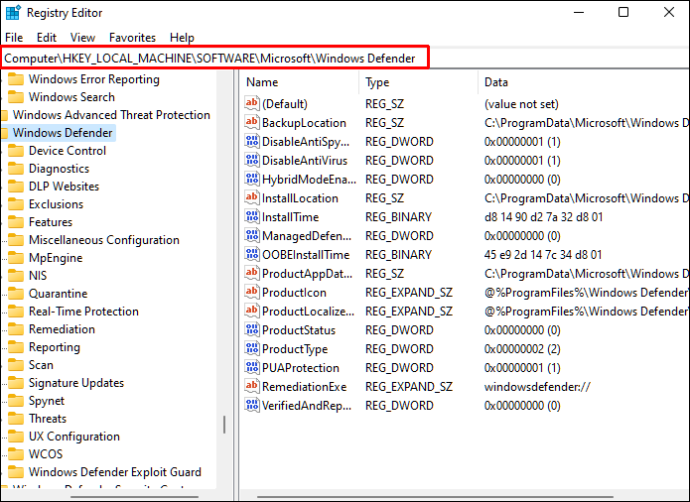
To edit or add a value to this folder, you’ll need to change the owner first. By default, the owner is System. Follow these steps to change the folder owner:
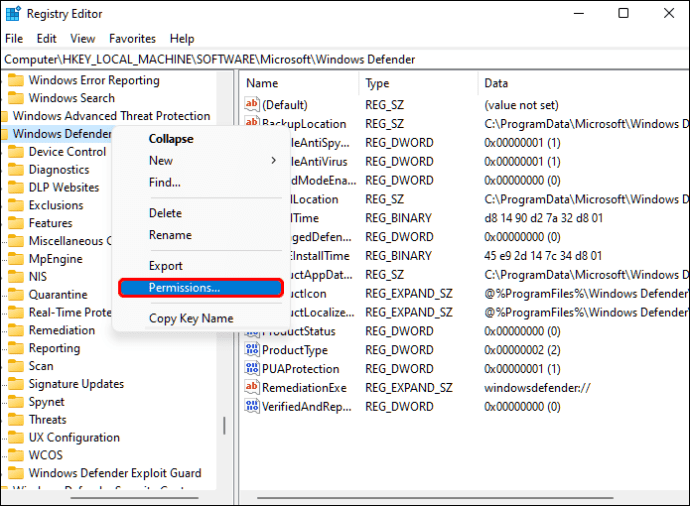
Right-click on the Windows Defender folder and choose Permissions.
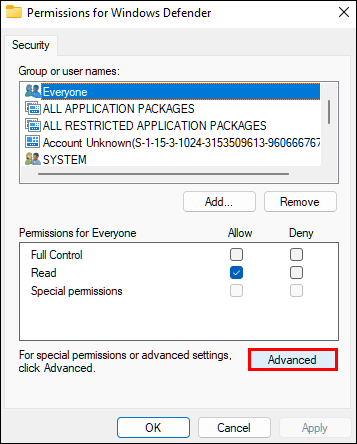
Click on Advanced in the Permissions for Windows Defender window.
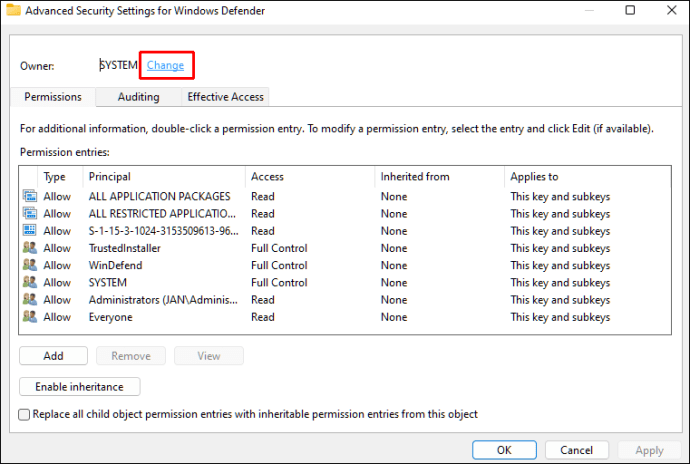
In the Owner field, click Change.
In the Advanced Security Settings for Windows Defender window, click Advanced.
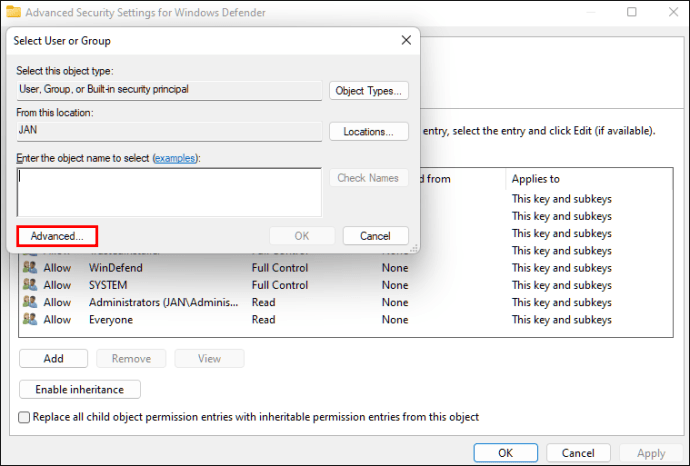
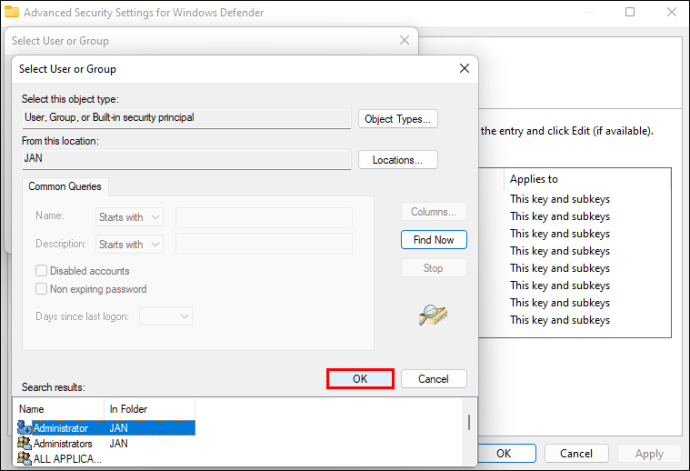
Click Find Now, then select the admin account or the admin’s group.
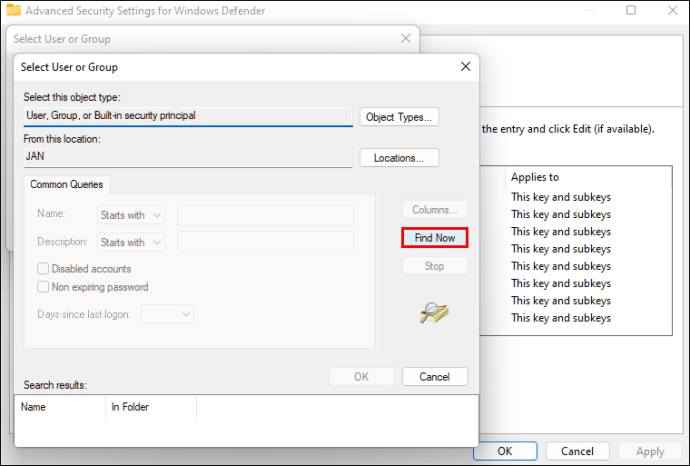
Click OK, then OK again to confirm the changes.
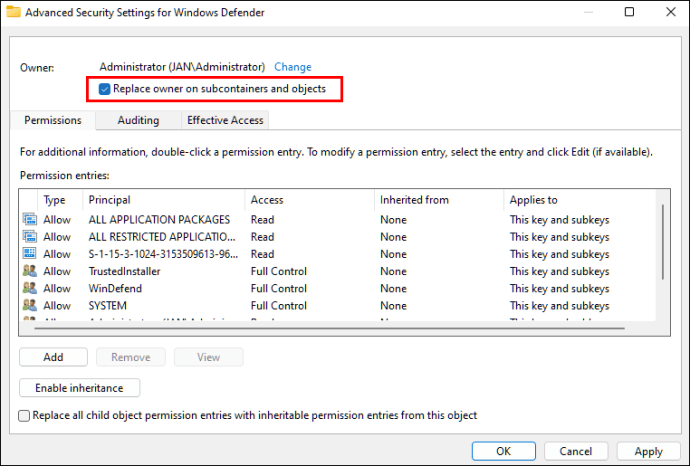
Check the box next to Replace owner on subcontainers and objects.
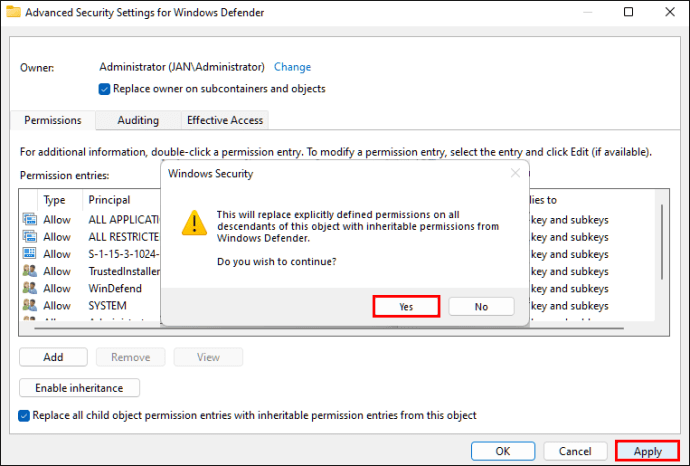
Check the box next to Replace all child object permission entries with inheritable permission entries from this object.
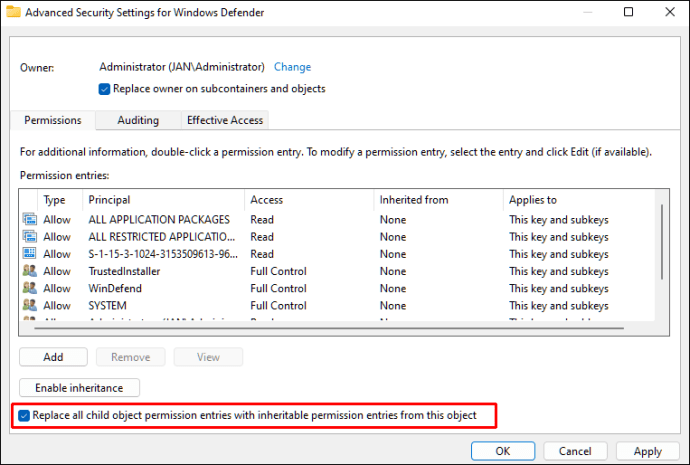
Click Apply, then in the Windows Security warning popup, click Yes.
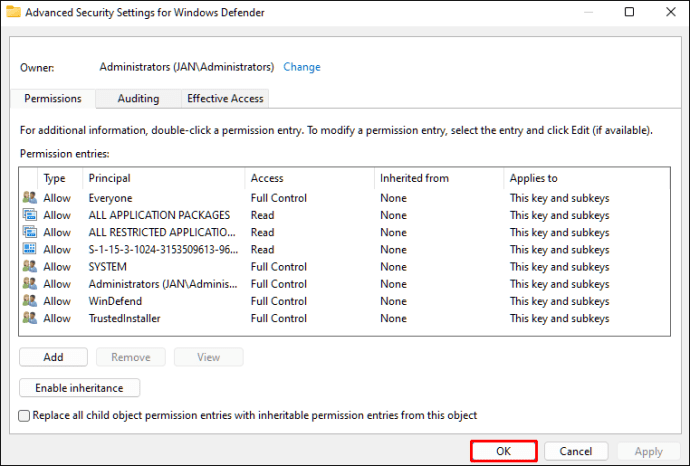
Click OK again to close the advanced security settings window.
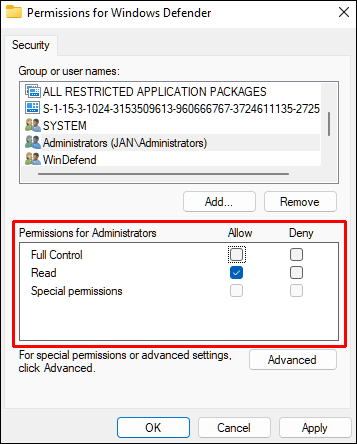
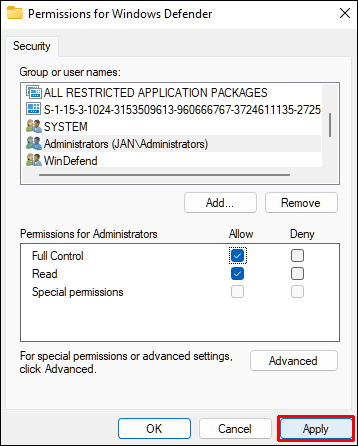
Now, navigate to the Permissions for Windows Defender window under the Permissions for Everyone section.
And to grant users complete control by checking Allow beside the Full Control option.
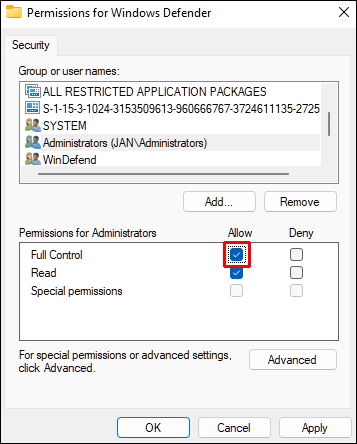
Click Apply and OK to confirm the change.
Finally, to edit the registry:
- Continuing from the Windows Defender branch in the Registry Editor, create three DWORD (32-bit) values. To do this, right-click any white space within the right pane, and select New, then the DWORD (32-bit) Value option.
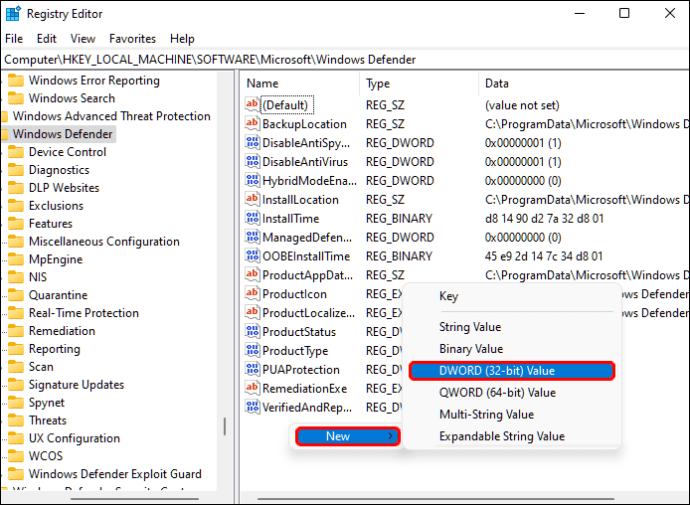
Name the new values as follows:
- DisableAntiVirus
- DisableAntiSpyware
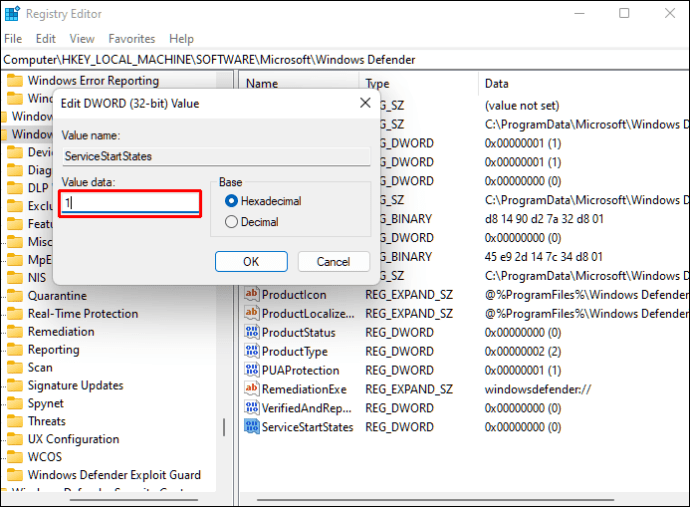
- ServiceStartStates
Right-click each value, select Modify, then change the Value data field to 1, then OK.
Now close the Registry Editor and restart your computer.
Once your computer restarts, the Windows Defender will be disabled.
2.3 Disable Windows Defender Using Autoruns
You can also permanently disable Windows Defender using the Autoruns for Windows utility tool. Here’s how:
Download the latest version of Autoruns for Windows.
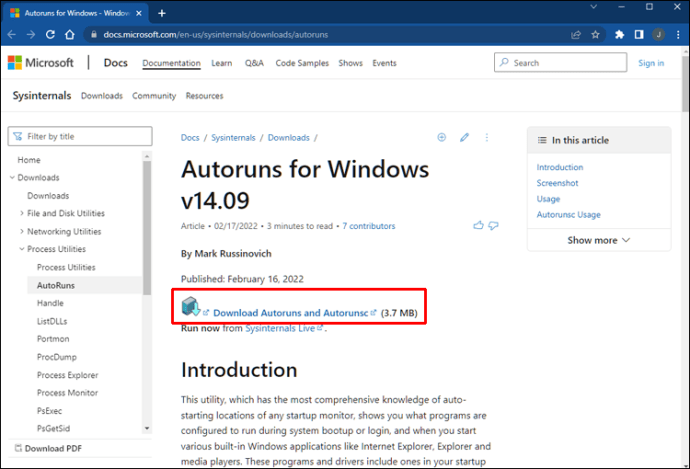
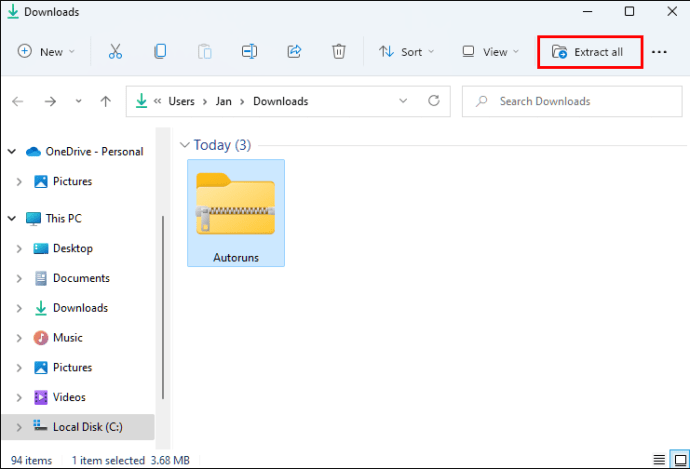
Open the downloaded file and right-click on the Autoruns folder to Extract All. Consider extracting the folder to your desktop for easy access.
Now you’ll need to disable permanent protection and boot in safe mode:
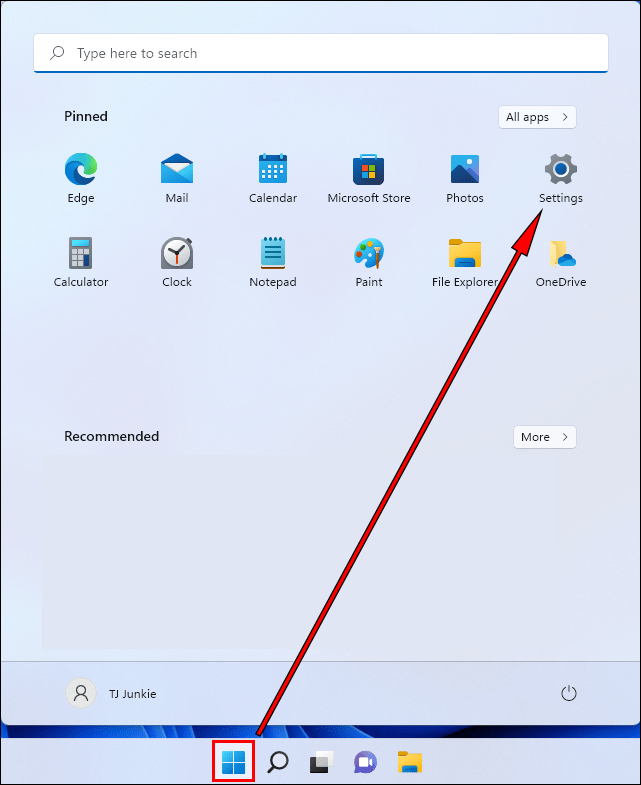
Press the Windows icon from the taskbar, then choose Settings.
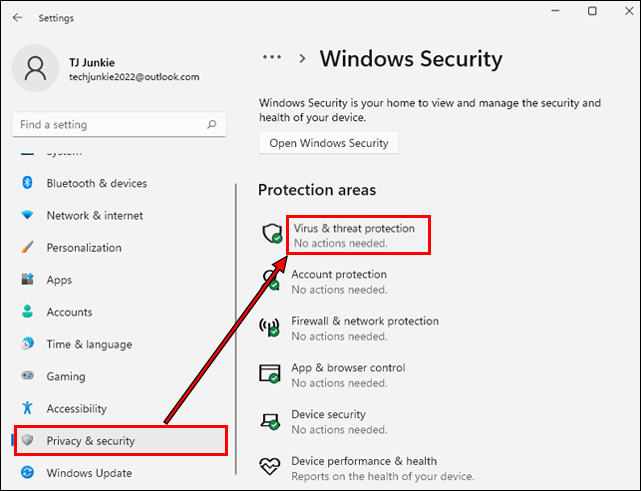
Choose Privacy & security, Windows Security, then Virus & threat protection.
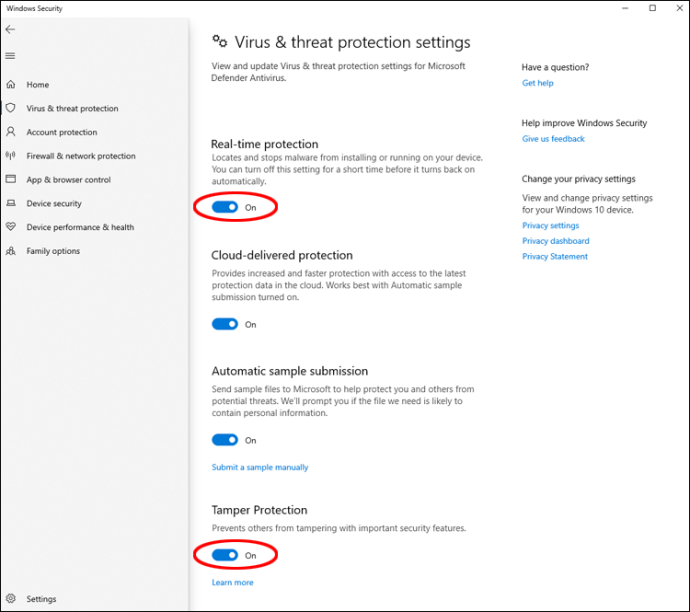
Under the Virus & threat protection section, select Manage settings.

Press the Real-time Protection and Tamper Protection sliders to deactivate them.
Next, to put your computer in Safe Mode, enter a search to find the System Configuration app, then open it.
In System Configuration, select the Boot tab.
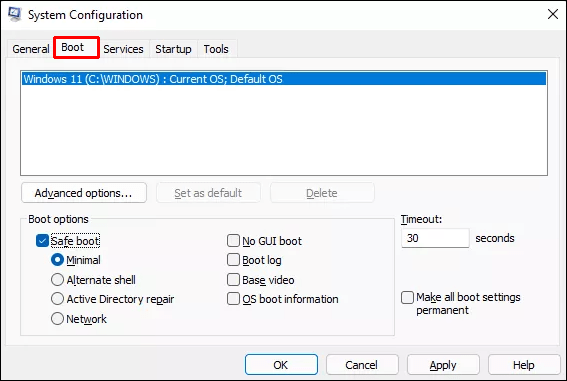
Under Boot options, check the Safe boot box, and the Minimal option will set automatically.
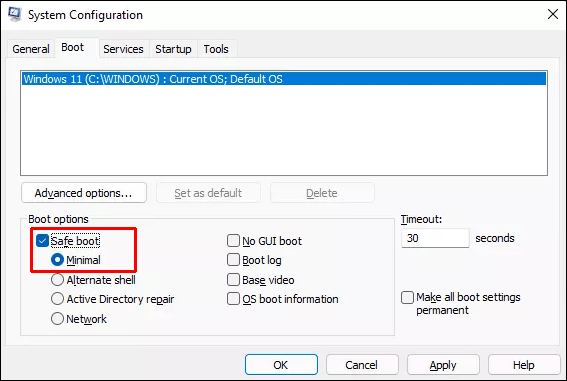
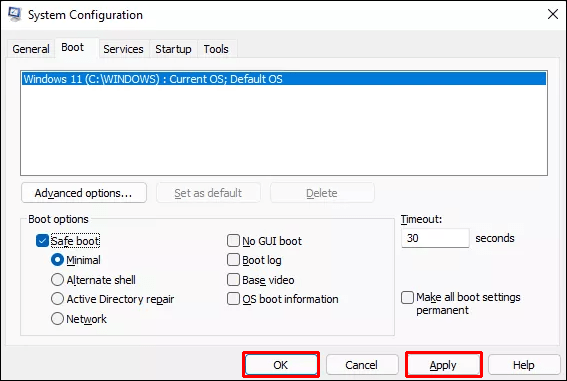
Hit Apply, OK, then Restart.
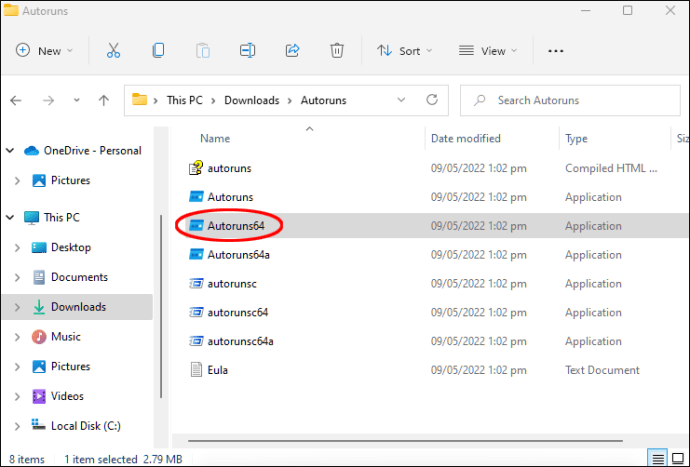
Open the Autoruns folder on your desktop, click the Autoruns64.ex file, then Run to start it.
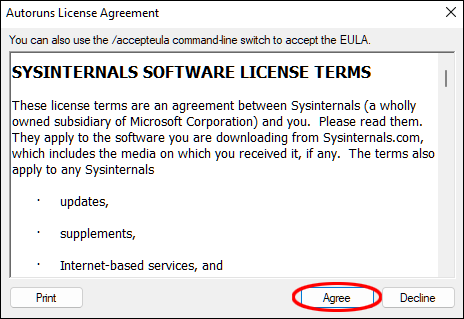
An Autoruns License Agreement window will display. If you agree with the terms, click Agree to continue.
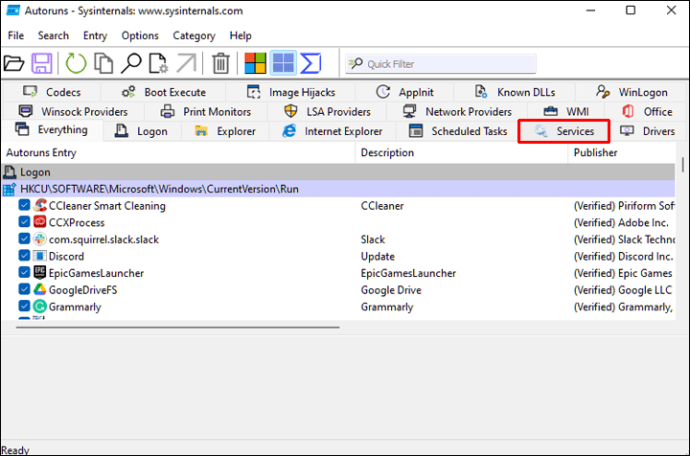
In the Autoruns window, choose the Services tab.
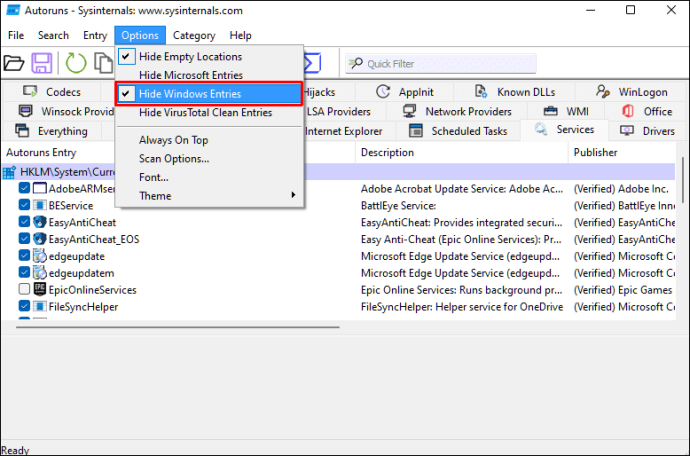
By default, Windows services are hidden. To make them visible, click on Options from the main menu, then uncheck the Hide Windows Entries.
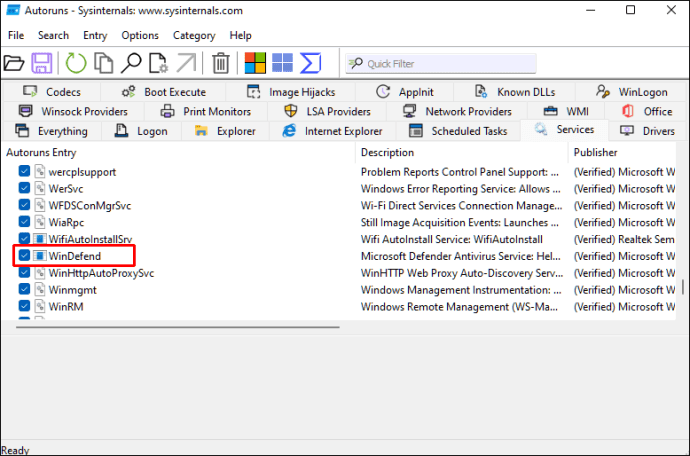
Go through the list of services for Windows Defender and uncheck the WinDefend box. This will disable the automatic startup for Windows Defender each time the computer reboots.
Now close Autoruns, then reboot your computer into normal mode.
To reboot your computer into normal mode:
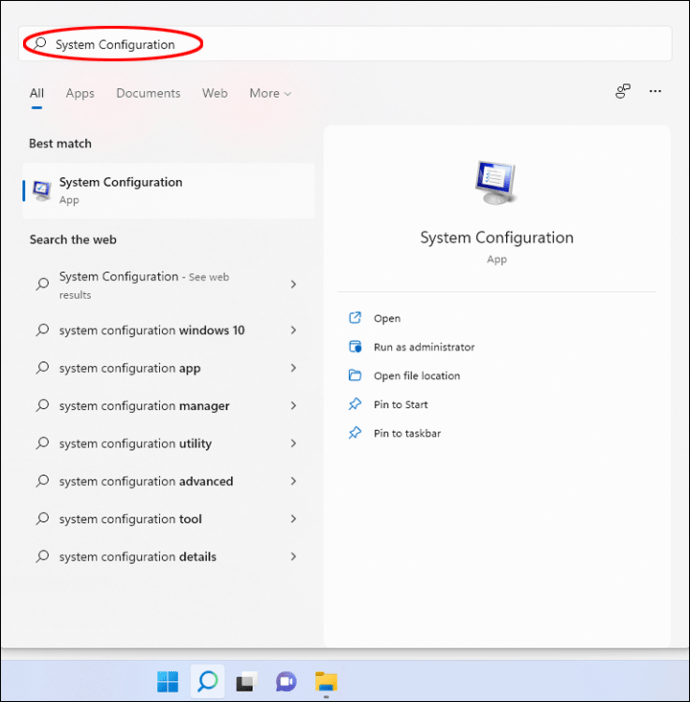
Press the Search icon on the taskbar and select System Configuration.
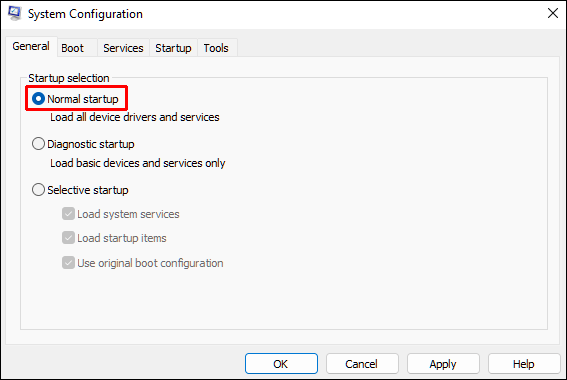
Check the Normal startup option.
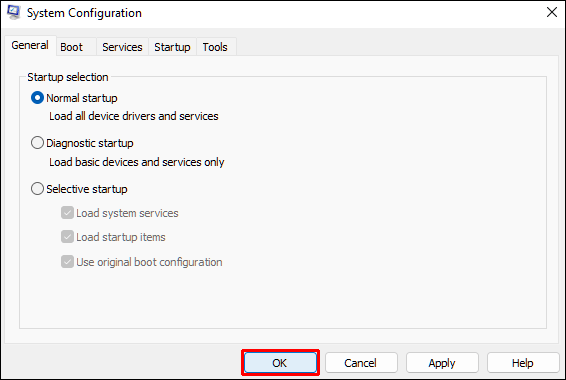
Click Apply, OK, then Restart.
Once your computer has rebooted, launch Task Manager and check if the Windows Defender service is running:
Open Settings to see the Virus & threat protection status. To get there, go to Privacy & security, Windows Security, Virus & threat protection, then Home.

Verify that the Virus & threat protection status is set to Unknown.
Note: Avoid clicking on the Defender tile as it updates its information or displays the “Unknown” status. If you click on it during that time, Defender will be enabled again.
原文链接:How To Disable Windows Defender In Windows 11
三、关闭休眠
运行命令powercfg.exe /hibernate off 可以关闭,如果要再次启用,运行powercfg.exe /hibernate on
四、Mac下Windows启动U盘制作
五、KMS 激活
5.1 KMS 安装
https://teddysun.com/530.html
5.2 激活 Windows
Windows 的 KMS Key:密钥管理服务 (KMS) 客户端激活和产品密钥
使用管理员权限运行 cmd 查看系统版本
wmic os get caption使用管理员权限运行 cmd 安装从上面列表得到的 key,命令如下:
slmgr /ipk xxxxx-xxxxx-xxxxx-xxxxx-xxxxx使用管理员权限运行 cmd 将 KMS 服务器地址设置为你自己的 IP 或 域名,后面最好再加上端口号(:1688),命令如下:
slmgr /skms Your IP or Domain:1688使用管理员权限运行 cmd 手动激活系统,命令如下:
slmgr /ato5.3 激活 office
Office 2019 & Office 2016:https://docs.microsoft.com/en-us/DeployOffice/vlactivation/gvlks Office 2013:https://technet.microsoft.com/zh-cn/library/dn385360.aspx Office 2010:https://technet.microsoft.com/zh-cn/library/ee624355(v=office.14).aspx
关于 Office 的激活,要求必须是 VOL 版本,否则无法激活。 找到你的 Office 安装目录,32 位默认一般为 C:\Program Files (x86)\Microsoft Office\Office16 64 位默认一般为 C:\Program Files\Microsoft Office\Office16 Office16 是 Office 2016,Office15 就是 Office 2013,Office14 就是 Office 2010。 打开以上所说的目录,应该有个 OSPP.VBS 文件。 使用管理员权限运行 cmd 进入 Office 目录,命令如下:
cd "C:\Program Files (x86)\Microsoft Office\Office16"使用管理员权限运行 cmd 注册 KMS 服务器地址:
cscript ospp.vbs /sethst:Your IP or Domain使用管理员权限运行 cmd 手动激活 Office,命令如下:
cscript ospp.vbs /act